Step-by-Step Guide: Setting Up WordPress with Nginx on Ubuntu 24.04 (LTS)
(Current Step) 1. Create and Secure a Virtual Private Server
2. Install Nginx PHP 8.3 WP-CLI MySQL
3. Setting Up WordPress with SSL on Nginx
- Set Up Domain on Cloudflare (Skip this if you want use Cloudflare in Step 4)
- Get SSL with Certbot (Skip this if you want use Cloudflare in Step 4)
- Configure Nginx to Host Website
- Create Database for WordPress
- Install WordPress with WP-CLI
- Add More Site to Your Server
4. Set Up Free SSL/TLS with Cloudflare to Nginx (Skip this if you using Certbot in Step 3)
5. Set Up Redis Object Cache and Nginx FastCGI Page Cache
To get started, you’ll need to meet a few requirements before Create and Secure a Virtual Private Server (VPS) on DigitalOcean. Review the requirements below to ensure you have everything you need. Once you’re good to go, we can jump right in.
Requirements
- Domain
In this guide, we’ll be working with a domain name. You can use either a main domain you own or a subdomain. A subdomain is a section of a larger domain, like tutorial.caklus.com is a subdomain of caklus.com. We’ll be using tutorial.caklus.com as an example throughout this tutorial. - Cloudflare
Cloudflare is a company that offers a variety of services to websites, including improving website speed and security. For this tutorial, we’ll be using one of their free offerings: a Secure Sockets Layer (SSL) certificate. An SSL certificate encrypts the communication between your website and visitors, making it more secure.
1. Create New VPS with DigitalOcean Droplet
The VPS/Droplet creation process is simple. Just choose your desired configuration, including operating system, memory size, and features like backups and monitoring. Popular options are already selected, so you can create a VPS/Droplet right away. But if you’re a power user, feel free to customize any setting.
You Don’t have a DigitalOcean account yet? No problem! Sign up for a free account with our referral link here and gets $200 in credit over 60 days.
- Once you’re logged in, look for the green Create button in the top right corner of the control panel. Click this button to get started.
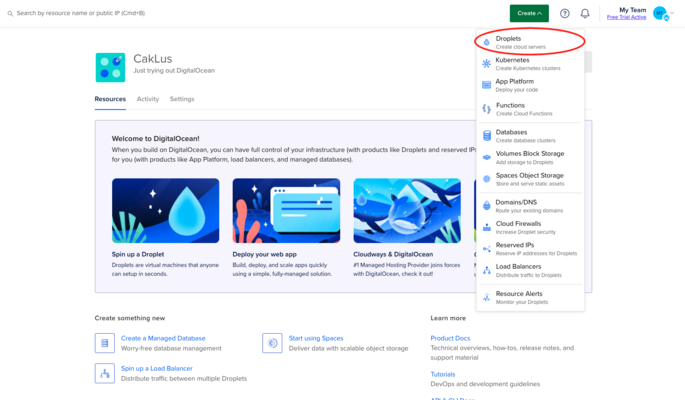
- To optimize speed, choose a VPS Region and Datacenter closest to your visitors. For a globally distributed audience, pick one near your location (like Singapore in this tutorial) to strike a good balance.

- Let’s select Ubuntu 24.04 (LTS) x64 as the operating system for your VPS/Droplet.
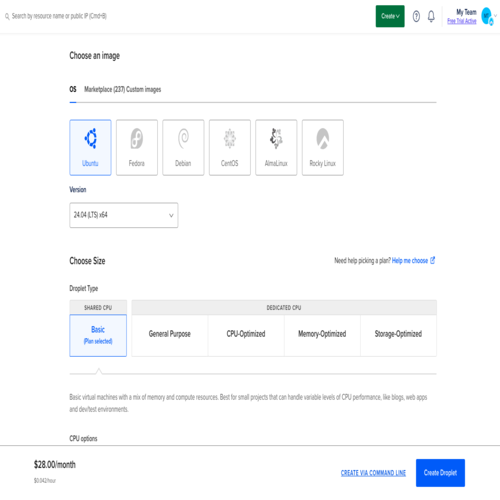
- Don’t worry about a fancy CPU! A standard option will work perfectly for this tutorial. To ensure smooth performance, choose a server with at least 2GB of memory. (For production environments, we recommend using VPS with 2 CPUs for optimal performance).
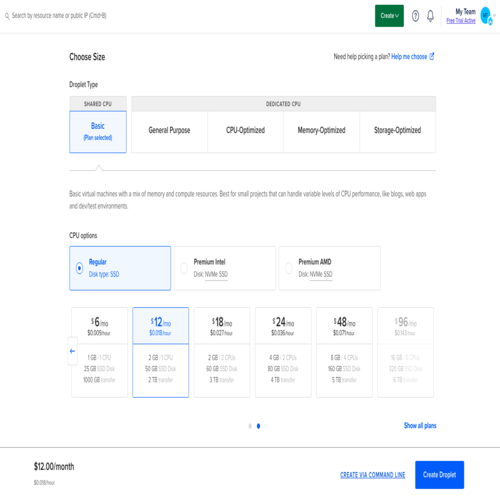
- While SSH key authentication is highly recommended for security, we’ll be disabling root login shortly. For this tutorial, choose the Password option under Choose Authentication Method. Remember to create a strong, unique password for temporary use.
- (Optional) Check the box next to Add improved metrics monitoring and alerting (free) for better server insights.
- As mentioned in Requirements, enter your domain name (e.g., caklus.com) or subdomain (e.g., tutorial.caklus.com) in the Hostname field.
2. First Connect to VPS Droplet with SSH
The VPS IP address for your Droplet will be shown in the IP Address column after creation. Simply hover your mouse over this address to copy it.
- To connect to your VPS/Droplet, open a terminal (Ctrl+Alt+T for Linux, search Terminal for macOS, use PowerShell on Windows. If OpenSSH is not installed on your machine by default, see MicroSoft’s documentation on how to do this).
- In your terminal window, type the following SSH command, replacing your_droplet_ip with your Droplet’s actual VPS IP address:
ssh root@your_droplet_ip- Get ready to type! Enter the password you created for your Droplet in the previous step.
Last login: Mon Jul  8 22:40:57 on ttys000
caklus@192 ~ % ssh root@167.172.77.192
The authenticity of host '167.172.77.192 (167.172.77.192)' can't be established.
ED25519 key fingerprint is SHA256:Jiunk+AasdaDg+YpmZ3UFZ1Z8lLBasidfogvvJOsdQY.
This key is not known by any other names.
Are you sure you want to continue connecting (yes/no/[fingerprint])? yes
Warning: Permanently added '167.172.77.192' (ED25519) to the list of known hosts.
root@167.172.77.192's password:
Welcome to Ubuntu 24.04 LTS (GNU/Linux 6.8.0-36-generic x86_64)

 * Documentation:  https://help.ubuntu.com
 * Management:     https://landscape.canonical.com
 * Support:        https://ubuntu.com/pro

 System information as of Mon Jul  8 15:41:37 UTC 2024

  System load:  0.0               Processes:             102
  Usage of /:   3.5% of 47.39GB   Users logged in:       0
  Memory usage: 9%                IPv4 address for eth0: 167.172.77.192
  Swap usage:   0%                IPv4 address for eth0: 10.15.0.5

Expanded Security Maintenance for Applications is not enabled.

12 updates can be applied immediately.
7 of these updates are standard security updates.
To see these additional updates run: apt list --upgradable

Enable ESM Apps to receive additional future security updates.
See https://ubuntu.com/esm or run: sudo pro status


The programs included with the Ubuntu system are free software;
the exact distribution terms for each program are described in the
individual files in /usr/share/doc/*/copyright.

Ubuntu comes with ABSOLUTELY NO WARRANTY, to the extent permitted by
applicable law.

root@tutorial:~#
3. Set a custom hostname and FQDN
Forget memorizing VPS IP addresses. Let’s give your server a cool name (hostname) and a proper domain association (FQDN) for smoother connections in the future.
- Hostnames can be anything unique, so get creative! Here’s how to set them up (replace
tutorial.caklus.comwith your actual domain).
hostnamectl hostname tutorial.caklus.com- Ditch the confusing VPS IP address! Let’s get your server a cool nickname (hostname) by logging into your domain control panel, creating a new A record that links it to your server’s address, and double-checking the hostname and IP match. Patience is key – it takes a few hours for this internet-wide change.(for Cloudflare users) turn off the proxy setting!

- After the DNS change takes effect (a few hours), you can ditch the VPS IP address! Simply use your vps server’s new hostname to connect again via SSH (replace
tutorial.caklus.comwith your actual domain).
ssh root@tutorial.caklus.com4. Configure your Server’s Timezone
- While DigitalOcean sets your server’s time zone to match the data center, you can adjust it for accurate logs. Run the following command to do this:
dpkg-reconfigure tzdata- A simple GUI will be displayed, allowing you to select your geographic area and time zone:
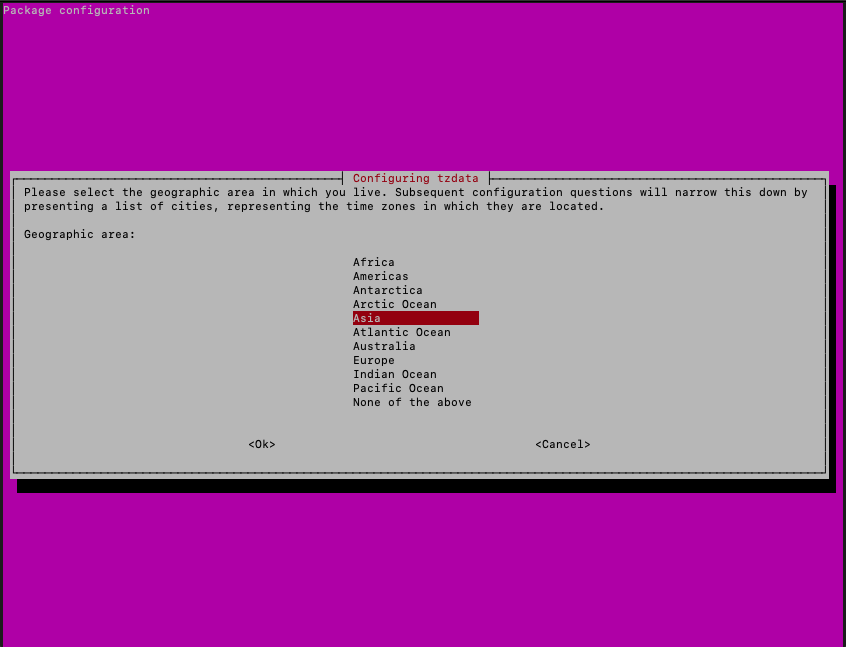
- The newly selected time zone will be confirmed with the current date and time after you’ve made your choice.
root@tutorial:~# dpkg-reconfigure tzdata

Current default time zone: 'Asia/Jakarta'
Local time is now:      Mon Jul  8 23:29:04 WIB 2024.
Universal Time is now:  Mon Jul  8 16:29:04 UTC 2024.
5. Install Software Updates
- Even though your server is brand new, some packages might be outdated. Let’s grab the latest updates by running:
apt update- Now, let’s upgrade all existing packages to get the latest security patches and features.
apt dist-upgradeWe recommend using apt dist-upgrade instead of apt upgrade because it smartly handles dependencies, ensuring a smooth update process.
You will be shown a list of the packages that will be updated. Review the update list, disk space usage, and confirm by pressing Enter to proceed with the updates.
- After the update, you’ll see a list of installed packages and any outdated ones you can remove. To remove outdated packages, run this command:
apt autoremove- Let’s restart the server to apply the updates:
reboot now- This will disconnect you from the server. Wait for the server to reboot before reconnecting via SSH.
ssh root@tutorial.caklus.com6. Automatic Security Updates
Server software updates are vital for security, but automatic updates can be risky, enable them for security updates only to keep your server patched without surprises.
Test non-security updates on a staging server first to avoid accidentally breaking your WordPress websites.
Automatic updates might already be on. If not, or you’re unsure, follow these steps:
- Install the unattended-upgrades package:
apt install unattended-upgrades- Create the required configuration files:
dpkg-reconfigure unattended-upgrades- You should see the following screen:
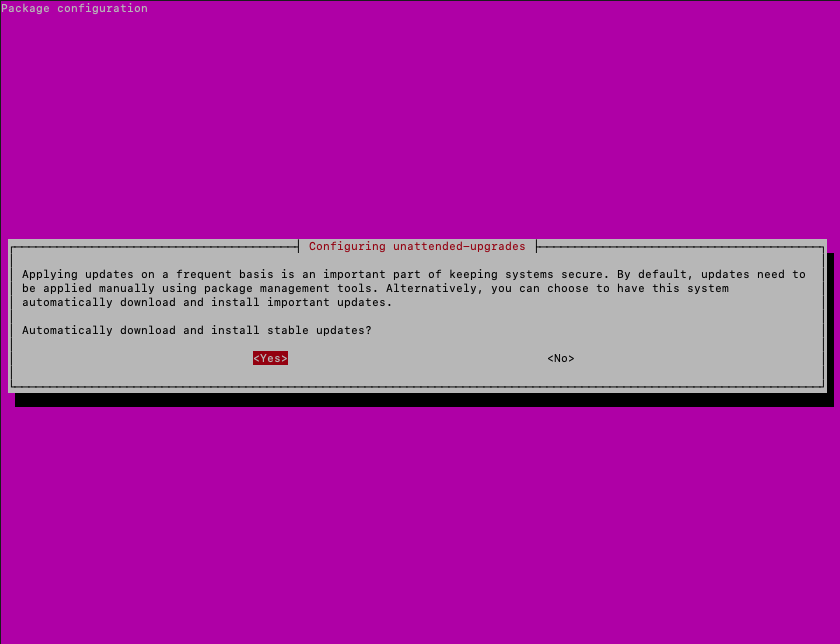
- Choose “Yes” and hit Enter. Then, edit the configuration file:
nano /etc/apt/apt.conf.d/50unattended-upgrades- Secure your configuration by allowing only the intended security origin (remove/comment out all others) – see the example below.
// Automatically upgrade packages from these (origin:archive) pairs
//
// Note that in Ubuntu security updates may pull in new dependencies
// from non-security sources (e.g. chromium). By allowing the release
// pocket these get automatically pulled in.
Unattended-Upgrade::Allowed-Origins {
            "${distro_id}:${distro_codename}";
            "${distro_id}:${distro_codename}-security";
            // Extended Security Maintenance; doesn't necessarily exist for
            // every release and this system may not have it installed, but if
            // available, the policy for updates is such that unattended-upgrades
            // should also install from here by default.
            "${distro_id}ESMApps:${distro_codename}-apps-security";
            "${distro_id}ESM:${distro_codename}-infra-security";
//          "${distro_id}:${distro_codename}-updates";
//          "${distro_id}:${distro_codename}-proposed";
//          "${distro_id}:${distro_codename}-backports";
};- Save the file using CTRL + X and then Y.\
- (Optional) Disable automatic server restarts after updates by uncommenting the following line:
Unattended-Upgrade::Automatic-Reboot "false";- You can also replace false with a time if you’d like the server to be restarted automatically at a specific time:
Unattended-Upgrade::Automatic-Reboot-Time "04:00";(Heads up) VPS Server restarts might be required after updates. While Nginx, PHP, and MySQL typically restart automatically, check this Stack Overflow thread for adding other critical services if needed.
- Finally, set how often the automatic updates should run:
nano /etc/apt/apt.conf.d/20auto-upgrades- Ensure that Unattended-Upgrade is in the list.
APT::Periodic::Unattended-Upgrade "1";The value you enter determines how often upgrades are performed. A number 1 means daily updates.
- Save your changes (Ctrl+X and then type Y and press Enter to confirm saving changes) and restart the service for them to take effect.
service unattended-upgrades restart7. Create a New User
With the web server’s foundation set up and security updates applied, let’s move on to adding a new user account. This step serves two important purposes:
- To enhance security, we’ll disable SSH access for the root user later in this chapter. This requires having a separate user account for managing your server.
- For everyday tasks, using the root user is risky. It has full access and can cause accidental damage. To avoid this, let’s create a new user with limited permissions.
By adding this user to the sudo group, you can still execute commands that require extra permissions when needed. This provides a balance between security and functionality.
- The first step is to add a new user.
adduser newuser- Now, you’ll provide a complex password (like the one we discussed earlier) and some basic user information for the new account.
root@tutorial:~# adduser newuser
info: Adding user `newuser' ...
info: Selecting UID/GID from range 1000 to 59999 ...
info: Adding new group `newuser' (1001) ...
info: Adding new user `newuser' (1001) with group `newuser (1001)' ...
info: Creating home directory `/home/newuser' ...
info: Copying files from `/etc/skel' ...
New password:
Retype new password:
passwd: password updated successfully
Changing the user information for newuser
Enter the new value, or press ENTER for the default
	Full Name []: New User
	Room Number []:
	Work Phone []:
	Home Phone []:
	Other []:
Is the information correct? [Y/n] y
info: Adding new user `newuser' to supplemental / extra groups `users' ...
info: Adding user `newuser' to group `users' ...
root@tutorial:~# - To give the new user permission to run commands with elevated privileges when needed, we’ll add them to the sudo group.
usermod -a -G sudo newuser- Once the setup is complete, test your new account by securely logging out of this SSH session and logging in again with the new username and password.
logout- Once logged out, initiate a new SSH session with your new username and password.
ssh newuser@tutorial.caklus.com8. Enhancing Security with SSH Keys: The Key Pair Generation Process
With your new user account set up, let’s strengthen security even further. Since you’ll be installing WordPress, which makes the server publicly accessible, it becomes a potential target for attacks. Public key authentication adds an extra layer of protection to keep unauthorized users out.
To set up public key authentication, we’ll need an SSH key pair, consisting of a public and private key. If you’ve already generated one, you can reuse it.
- To generate a new SSH key pair, run this command in your local terminal (not on the remote server):
ssh-keygen -t ed25519 -C "[email protected]"Substitute [email protected] with a descriptive label to easily recognize this specific key pair. It can be anything you prefer, not necessarily an email address.
You’ll then be prompted to create a passphrase (optional). This adds an extra layer of security by requiring a password whenever you log in using this key pair. Choosing a strong passphrase is highly recommended, but it’s not mandatory.
caklus@CakLus-MBP:~$ ssh-keygen -t ed25519 -C "[email protected]"
Generating public/private ed25519 key pair.
Enter file in which to save the key (/Users/caklus/.ssh/id_ed25519):
Enter passphrase (empty for no passphrase):
Enter same passphrase again:
Your identification has been saved in /Users/caklus/.ssh/id_ed25519
Your public key has been saved in /Users/caklus/.ssh/id_ed25519.pub
The key fingerprint is:
SHA256:6zrqae1MT26zBVOHzGWVWJxH8xjrWr8TWM8io6Qsdx8 newuser@tutorial.caklus.com
The key's randomart image is:
+--[ED25519 256]--+
|            o=+=.|
|         o +. +++|
|          = . o..|
|         . . . . |
|        S     =..|
|         +. o+.oo|
|     ...oo..Eo .o|
|    .++=*.o  . ..|
|   o+o+*=+ ..  ..|
+----[SHA256]-----+
9. Secure Login: Retrieving the Public Key
- With your SSH key pair generated, let’s add the public key to your vps server for secure login. Switch back to your SSH session on the remote vps server and ensure you’re logged in with the new user account. We’ll first create a secure directory to store the key.
mkdir   ~/.ssh
chmod 700 ~/.ssh- Now, let’s create a file specifically for authorized SSH keys. Within the .ssh directory, type the following command to create a new file named authorized_keys:
nano ~/.ssh/authorized_keys- Back on your local computer’s terminal (not the vps server), assuming you kept the default location for the key pair, use this command to copy the public key content to your clipboard:
cat ~/.ssh/id_ed25519.pub | pbcopy- On the remote server terminal, paste the copied public key content into the authorized_keys file. Once the key is pasted, Press Ctrl+X to exit the editing mode and then Type Y and press Enter to confirm saving changes, set the correct permissions on authorized_keys to ensure only your user can access it:
chmod 600 ~/.ssh/authorized_keysWith public key authentication set up, log out of your current SSH session and try logging back in. You should no longer need to enter your user password! However, if you created a passphrase for your SSH key pair during generation, you’ll be prompted to enter it during login.
In the following steps, I’ll use sudo before certain commands. This is because they require a higher level of access (root privileges). It’s important to note that using sudo should be done with caution and only when necessary.
10. Securing Your Connection: SSH Configuration
- Now that your new user is set up, let’s strengthen server security by configuring SSH. As a best practice, we’ll disable direct SSH access for the root user. This means you won’t be able to log in using root anymore.
sudo nano /etc/ssh/sshd_config- In the SSH config file, change PermitRootLogin yes to no, save (Ctrl+X and the type Y and press Enter to confirm saving), and restart SSH.
sudo service ssh restartDisabling root login as instructed will result in a permission denied error if you try to connect again with the root user (even with the correct password).
- As the final step in securing SSH, we’ll disable password logins, requiring your private key for access. Remember, losing your private key locks you out! While some providers (like DigitalOcean) offer alternative login methods, but it’s best not to rely on those methods:
sudo nano /etc/ssh/sshd_config- In the SSH config file, uncomment (remove the # symbol) and change PasswordAuthentication yes to no. Save (Ctrl+X and the type Y and press Enter to confirm saving) and restart SSH to disable password logins (remember your new user account needs a private key for future access).
sudo service ssh restart- Test the new configuration without disrupting your current session: Open a new terminal window on your local machine and try connecting to the vps server using your new user account and private key.
ssh newuser@tutorial.caklus.comYou should log in to the server successfully. To further test that password authentication is disabled, temporarily rename the SSH key located in my .ssh directory. When attempting to log into the vps server this time you should receive a Permission denied (publickey) error.
- If password login persists, check /etc/ssh/sshd_config.d for included configs overriding PasswordAuthentication.
newuser@tutorial:~$ sudo ls -la /etc/ssh/sshd_config.d
[sudo] password for newuser:
total 16
drwxr-xr-x 2 root root 4096 Jul  8 22:08 .
drwxr-xr-x 4 root root 4096 Jul  9 06:29 ..
-rw------- 1 root root   27 Jul  8 22:08 50-cloud-init.conf
-rw-r--r-- 1 root root   26 Jun 28 15:37 60-cloudimg-settings.conf
In this case, there’s one configuration file containing one line PasswordAuthentication yes. Comment out that line or delete the file, restart the SSH service again, and hopefully you get the Permission denied (publickey) error.
11. Securing Your VPS Server with Uncomplicated Firewall (UFW)
- Firewalls add a crucial layer of security by controlling incoming network traffic. While powerful tools like iptables exist, we’ll use the user-friendly ufw (Uncomplicated Firewall) pre-installed on most systems. If not installed, run the following command:
sudo apt install ufw- With the default rules blocking incoming connections, let’s open specific ports for SSH (22), HTTP (80), and HTTPS (443) to enable remote access and web services.
sudo ufw allow ssh
sudo ufw allow http
sudo ufw allow https- Before applying, let’s double-check the rules to be added. Use the following command to see a preview:
sudo ufw show addednewuser@tutorial:~$ sudo ufw show added
Added user rules (see 'ufw status' for running firewall):
ufw allow 22/tcp
ufw allow 80/tcp
ufw allow 443
newuser@tutorial:~$ - Verify SSH port (22) is allowed in listed rules (disabling SSH locks you out), then cautiously enable firewall with:
sudo ufw enable- To confirm that the new rules are active, enter the following command:
sudo ufw status verbose- Default UFW settings block all incoming traffic except essential ports (22, 80, 443) for IPv4 and IPv6, providing a solid security foundation for most servers.
newuser@tutorial:~$ sudo ufw status verbose
Status: active
Logging: on (low)
Default: deny (incoming), allow (outgoing), disabled (routed)
New profiles: skip

To                         Action      From
--                         ------      ----
22/tcp                     ALLOW IN    Anywhere
80/tcp                     ALLOW IN    Anywhere
443                        ALLOW IN    Anywhere
22/tcp (v6)                ALLOW IN    Anywhere (v6)
80/tcp (v6)                ALLOW IN    Anywhere (v6)
443 (v6)                   ALLOW IN    Anywhere (v6)
12. Adding Intrusion Protection: Install Fail2ban
Fail2ban is an intrusion prevention tool that complements your firewall. It monitors login attempts and automatically blocks suspicious IPs for a set time. This is especially important for WordPress servers, as it can significantly reduce the risk of brute-force attacks and other malicious activity. Installing Fail2ban is highly recommended, especially if you plan to use third-party plugins, which can introduce additional security vulnerabilities.
- Let’s go ahead and install Fail2ban for additional security.
sudo apt install fail2ban- The default configuration should suffice, which will ban a host for 10 minutes after 6 unsuccessful login attempts via SSH. To ensure the fail2ban service is running enter the following command:
sudo service fail2ban start- And to check that it’s running, run the
statuscommand:
newuser@tutorial:~$ sudo service fail2ban status
● fail2ban.service - Fail2Ban Service
     Loaded: loaded (/usr/lib/systemd/system/fail2ban.service; enabled; preset: enabled)
     Active: active (running) since Tue 2024-07-09 07:27:31 WIB; 24s ago
       Docs: man:fail2ban(1)
   Main PID: 6515 (fail2ban-server)
      Tasks: 5 (limit: 2320)
     Memory: 22.9M (peak: 26.0M)
        CPU: 778ms
     CGroup: /system.slice/fail2ban.service
             └─6515 /usr/bin/python3 /usr/bin/fail2ban-server -xf start

Jul 09 07:27:31 tutorial.caklus.com systemd[1]: Started fail2ban.service - Fail2Ban Service.
Jul 09 07:27:31 tutorial.caklus.com fail2ban-server[6515]: 2024-07-09 07:27:31,674 fail2ban.configreader   [6515>
Jul 09 07:27:32 tutorial.caklus.com fail2ban-server[6515]: Server ready
This secure environment provides a solid platform to launch your WordPress web server. Remember, security is an ongoing process. Here are some key points to consider for continued protection:
- Only install server software (e.g. Nginx, PHP, MySQL) only from trusted sources
- Regularly install software updates and security fixes
- Enforce strong passwords using a tool such as 1Password
- Think about how you would gain access to the server if you were locked out
This chapter laid the groundwork for a secure WordPress environment. In the next chapter, we’ll dive into installing the essential components: Nginx web server, PHP-FPM for processing PHP code, and MySQL database for storing your website’s data. We’ll also explore securing your server with a Let’s Encrypt SSL certificate and setting up automated backups for added peace of mind. Stay tuned!


